
Transition Masterclass: How to Stop Bleeding Time in T1 and T2 (And Actually Enjoy the Chaos)
You spent 14 weeks following a training plan to the letter. Long rides in the rain. Pre-dawn swim sessions. Tempo runs that made you briefly question your life choices. You shaved 3 minutes off your 10K time and brought your FTP up 15 watts. Then race day arrives, and you stand in T2 for 4 minutes searching for your race belt. That is not a fitness problem. That is a preparation problem, and it is entirely fixable with triathlon transition tips that cost you nothing except a bit of practice time.
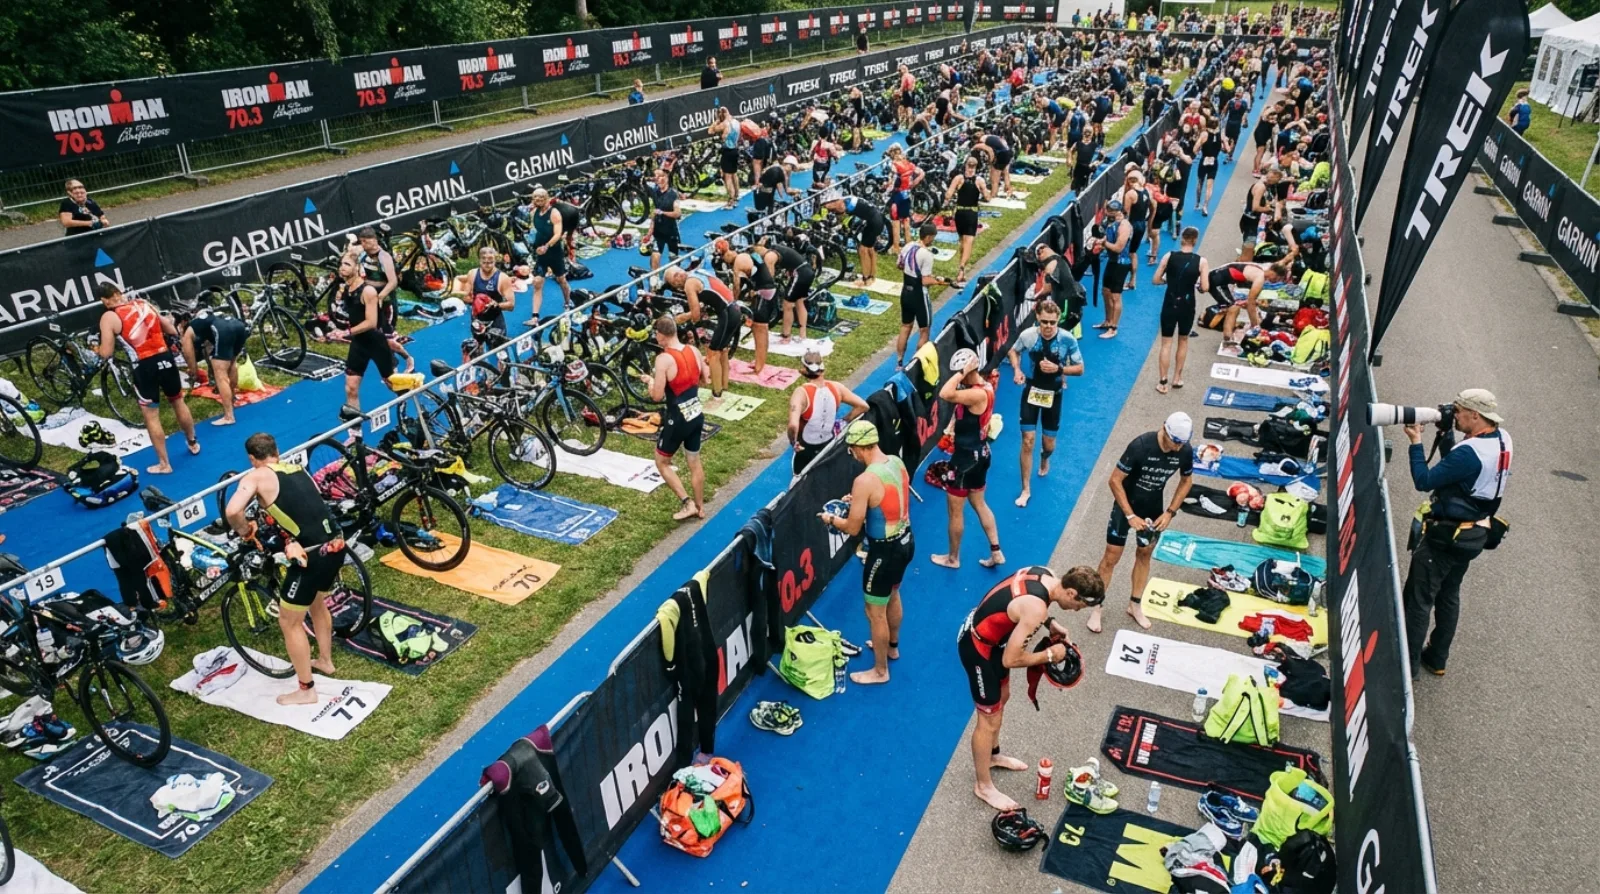
Transitions are officially the fourth discipline of triathlon, and unofficially the one discipline that almost nobody actually trains. Elite athletes treat T1 and T2 as part of the race -- because they are. At the professional level, T1 times at sprint distance are under 45 seconds. Age groupers routinely spend 3 to 5 minutes doing the same thing. That gap is not talent. It is practice, preparation, and a clear sequence executed under pressure. The good news: you can close most of that gap before your next race without adding a single training session.
T2 is a bloodbath of good intentions and poor planning. The athlete who trained with discipline for months will casually tie standard shoelaces while their heart rate spikes and their hands shake. Every second you spend fumbling in transition is a second you worked months to earn -- and then handed back for free. This guide is your way out of that cycle.
The 7 Transition Sins That Are Costing You Minutes
These are the most common triathlon transition tips violations that separate a 90-second T2 from a 5-minute one. None of them require more fitness. All of them require more thought.
-
Tying Standard Shoelaces in T2
Your hands will be shaking. Your legs will feel like concrete. Tying a double-knot while your cardiovascular system is in chaos costs 45 to 90 seconds every single race. The fix costs about eight dollars: elastic speed laces or lock laces, installed the week before your race. Slip your foot in, pull the tab, done. If you are still tying laces in T2, you are leaving the easiest time save in triathlon on the table.
-
Not Racking the Bike in the Correct Gear
You rack your bike, clip in, push off -- and you are in the 53-11 because you hammered the last 200 metres into transition. Now you are grinding your way to 15 km/h while your legs revolt. Rack your bike in a gear you can actually spin off the line: a mid-range gear that lets you establish cadence before building speed. Check it the night before and check it again after your warm-up.
-
Your Watch Requiring Setup Time
If you are fumbling through menus to switch your watch from swim mode to bike mode while standing at your rack, you have a pre-race problem, not a transition problem. Set your watch to multisport mode before the race starts. One button transitions you through disciplines automatically. If your current watch does not support multisport mode, that is useful information to have before race morning.
-
Over-Packing the Transition Bag
Your transition area is not a changing room. Every item you place there is a decision point under race pressure -- and decisions slow you down. One athlete famously trained 14 weeks for a sprint tri, then spent 6 minutes in T1 applying sunscreen. Apply sunscreen before you rack your bike. Ruthlessly eliminate anything from your transition setup that does not serve a direct functional purpose during the race.
-
Putting Your Helmet on After Your Shoes (USAT Violation)
Under official USA Triathlon rules, your helmet must be fastened on your head before you touch your bike. Not before you mount it -- before you even pick it up off the rack. If a race official sees you grab your bike before your helmet is buckled, you are looking at a time penalty. The sequence is non-negotiable: helmet on and buckled, then everything else, then bike. Build this as muscle memory before race day or it will bite you when your adrenaline is running the show.
-
Not Knowing the Fastest Route Through Transition
Walk the transition area before the race. Identify your rack spot from the swim exit. Count rows from the end, use a landmark, look for your bright towel or balloon marker. Know where the mount line is. Know the most direct path from your rack to it. This costs 10 minutes of pre-race time and saves 30 to 90 seconds on race day when you would otherwise be jogging slowly in circles looking confused.
-
Never Practising Any of This
Transitions feel simple until you are executing them with elevated heart rate, shaking hands, and 200 other athletes doing the same thing around you. The sequence you have never rehearsed will fall apart under pressure. Twenty minutes of transition practice in your driveway -- timed, sequential, repeated -- is worth more race-day minutes than most training sessions you will complete this season.
How to Set Up the Perfect Transition Zone
The goal of your transition setup is that you can read the entire layout in one glance and execute it without making a single decision. Every item has a home. Every item is positioned in the exact order you will need it.
Finding and Marking Your Spot
When you rack your bike, count your position from the end of the row and from a permanent landmark -- a numbered rack post, a barrier, a sign. Use a distinctively coloured towel (not beige, not grey -- something that pops) laid flat on the ground beneath your bike. Some athletes use a small balloon tied to their saddle or rack. Whatever your method, it needs to work when you exit the water disoriented with 200 bikes in your peripheral vision.
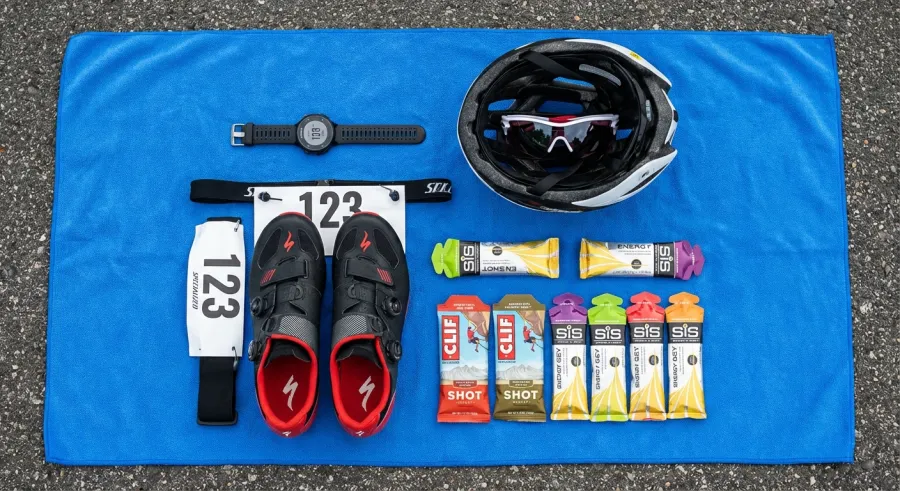
T1 Layout (Left to Right, Swim to Bike)
- Towel: Flat on the ground. This is your base layer for everything.
- Helmet: Upside down at the front of your space, straps unbuckled, open and ready to drop onto your head. Front of helmet facing toward you.
- Sunglasses: Inside the helmet, temples open, ready to grab and put on in one motion.
- Cycling shoes: Either clipped to your pedals with rubber bands (advanced -- requires flying mount practice) or on the ground, velcro straps open, positioned heel-toward-you for easy entry.
- Race belt: Clipped open, laid across the towel or across your run shoes if you are putting it on in T2.
- Nutrition: Already on your bike. Not in your bag. Not in your pocket. On the bike, in the bottle cage or in your top tube bag.
T2 Layout (Bike to Run)
- Running shoes: At the back of your towel, elastic laces open, heels pulled down and ready. A light dusting of talcum powder inside prevents blisters on wet feet.
- Race belt: If not worn on the bike, clipped open beside your shoes.
- Hat or visor: On top of or beside your running shoes.
- Run nutrition: Gels in your tri suit pocket already, or attached to a loop on your race belt. Not in your transition bag.
Single-glance principle: if you can look at your setup from the swim exit and immediately know where everything is without scanning, searching, or thinking, your layout is correct.
The T1 Sequence: From Swim Exit to Mount Line
T1 starts the moment you exit the water. Not when you arrive at your bike. Start working the moment your feet hit the ground.
- Exit the water running. Not jogging. Running. Your wetsuit zipper cord should already be in your hand or grabbed within the first few strides.
- Goggles and swim cap off while you run -- tuck them in your hand or drop them. Do not carry them to your rack and then deal with them. Deal with them now.
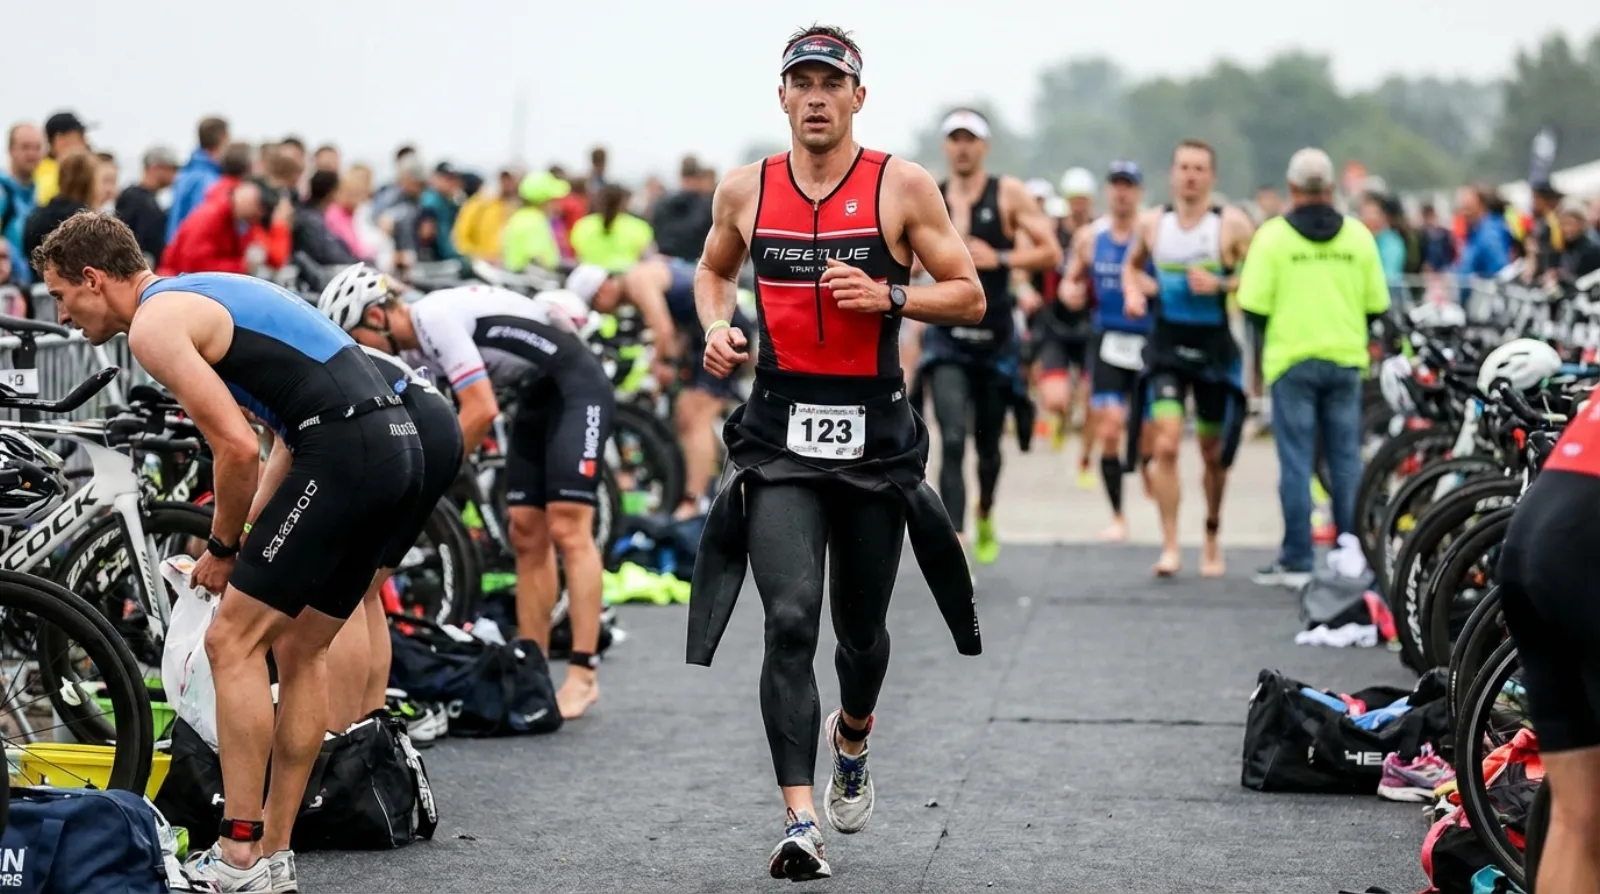
- Wetsuit top half down by the time you hit your rack. Unzip on the run, peel the top half down to your waist, arms out. When you arrive at your rack, you are stepping out, not wrestling.
- Helmet on and buckled. FIRST. Before anything else. This is not optional -- it is a USAT rule and a race penalty if you skip it. Drop the helmet onto your head, clip the buckle, confirm it is secure. Only then do you touch your bike.
- Sunglasses on -- pull them from inside the helmet as you move.
- Wetsuit off -- step on the legs to pull your feet free. A dab of Body Glide on your ankles the night before makes this dramatically faster.
- Cycling shoes -- slip in, velcro or BOA closed. If shoes are clipped to pedals, skip this and deal with shoes once you have momentum on the bike.
- Grab nutrition if needed, then grab your bike. Run your bike to the mount line -- do not mount before the line.
- Mount and go. Flying mount if you have practised it. Standard mount if you have not. Attempting a flying mount for the first time on race day is a memorable experience for all the wrong reasons.
Target T1 time: under 90 seconds for sprint and Olympic distance. Under 3 minutes for 70.3. If you are consistently hitting 4 to 5 minutes, the sequence above will fix most of it.
The T2 Sequence: From Dismount Line to the Run
T2 is where the wheels come off for most age groupers -- sometimes literally, if the dismount goes poorly.
- Dismount before the dismount line. Not at it. Before it. USAT officials position themselves there and time penalties for crossing the line on your bike are not rare. Slow down, unclip, dismount, then cross the line on foot running your bike.
- Run your bike to your rack. Do not walk. The transition area is still the race.
- Rack your bike correctly. By the saddle, straight on the rack. A bike that falls off the rack mid-transition costs you 20 seconds minimum and the goodwill of whoever it lands on.
- Helmet off AFTER the bike is racked. This is the second USAT rule athletes miss most. Bike on rack first, then unbuckle the helmet. Not before. Not during. After.
- Running shoes on. Sit down only if you must. Most athletes can slip into elastic-laced shoes standing or with one hand on their bike for balance.
- Race belt on while moving. Clip it as you walk or jog out of transition. You do not need to be stationary for this.
- Hat or visor on while moving. Same principle.
- Exit transition and run.
Your legs will feel like concrete for the first 400 to 800 metres of the run. This is called bike-to-run adaptation and it happens to everyone, including professionals. Walking for the first 30 seconds while you sort your shoes and race belt is a legitimate strategy -- it costs you seconds and may save you from blowing up the first kilometre. The athlete who sprints out of T2 with both shoes untied and then death-marches the next 10K has not actually made a good decision.
How to Practise Transitions (Yes, in Your Driveway)
The single most impactful thing most age groupers can do before their next race is spend 20 minutes practising transitions in their driveway. Not riding. Not swimming. Practising transitions. If you have never timed your T2, you genuinely do not know what you are dealing with.
The Driveway T2 Drill
Set up a full T2: shoes, race belt, hat, towel, bike racked on a stand. Start your watch. Execute the full sequence from dismount to leaving transition. Stop the watch. Note the time. Do it again. Your goal is to identify the exact moment where time is being lost -- usually it is the shoes, the race belt, or a moment of indecision about what comes next. Repeat 5 to 10 times until the sequence is automatic.
Wetsuit Removal Drill
Put your wetsuit on. Run 200 metres. Execute the full removal on the run -- unzip, arms out, top half down, step out. Time it. If it takes you more than 45 seconds from first touch to wetsuit on the ground, you need more repetitions. Body Glide on ankles and wrists is not optional for this drill or race day.
Flying Mount and Dismount Drill
Only attempt this after your wetsuit removal and basic transition sequences are solid. Practice flying mounts in a car park -- shoes clipped to pedals, running start, vault onto the saddle, feet into shoes while rolling. Same for the dismount. This is advanced territory and genuinely saves 15 to 30 seconds in T1 and T2, but only if you have actually practised it. A grass-covered car park is a forgiving first venue.
Full Brick with Timed Transitions
Once a week, include a full timed transition as part of your brick session. Ride out, come back, execute T2 on the clock, immediately run. Treat it like race day. The combination of actual fatigue plus the transition sequence is what you are training for -- not the calm, fresh practice in your driveway, though that comes first.
Twenty minutes of focused transition practice beats most training sessions in terms of raw race-day time savings. You would not skip swim or bike training and hope the fitness shows up. Do not skip this either.
Triathlon Transition Tips: What to Pack, What to Leave Home
Your transition bag is not a survival kit. It is a race bag. The difference is significant.
Race Morning Bag (What You Carry In, What You Carry Out)
- Bike pump (pump tyres, return to car)
- Nutrition for the bike (goes on the bike, not in the bag)
- Spare tube and CO2 (goes on the bike or in your jersey pocket)
- Bodyglide and sunscreen (applied before rack check-in -- not in transition)
- Wetsuit (goes on your body before the start)
Sprint Distance: T1 Setup
- Helmet with sunglasses inside
- Cycling shoes (or shoes on pedals)
- Bright towel
- Race belt (if not worn on bike)
Sprint Distance: T2 Setup
- Running shoes with elastic laces
- Race belt (if not already worn)
- Hat or visor (optional)
Olympic Distance: Add to Sprint
- Additional water bottle on bike
- Nutrition on bike or in tri suit pocket
- Cycling gloves (only if you truly need them -- they cost you 30 seconds in T1)
70.3 (Half IRONMAN): Add to Olympic
- Separate T1 and T2 bags if the race uses point-to-point transition layout
- Socks (acceptable at this distance -- sock feet for a 21km run is a legitimate choice)
- Additional nutrition for both bike and run
- Bike jersey or additional layers if weather dictates
- Sunscreen in a small pocket tube (you will be out there long enough to need it -- but it goes on in transition, not at a 6-minute dedicated sunscreen station)
At a sprint triathlon, the athlete who arrives with a rolling suitcase, a folding chair, and a portable fan is not better prepared -- they are just carrying more decisions into the race. Minimise gear, minimise decisions, minimise time.
Go Set Up Your Driveway This Weekend
Here is the truth: transitions reward preparation, not fitness. You do not need to get faster or stronger to shave 90 seconds from your T1 and 2 minutes from your T2. You need to know your sequence, practise it until it is automatic, and set up your gear so that every item is exactly where your hands expect to find it. Any athlete at any level can make dramatic improvements to their transition times before the next race -- without touching their swim, bike, or run training at all.
This weekend, go set up your driveway. Get your gear out, lay it in order, set a stopwatch, and go. Do it five times. Find where the time is going. Fix it. Race day will feel completely different when T2 is a sequence you execute rather than a problem you solve in the moment. The work is not hard. It just has to actually happen.


